Update 2:

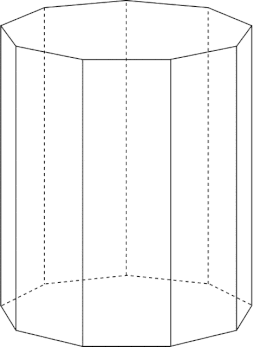
For the real life application of this project, I decided to measure the volume of a Zeppelin airship that we were creating for the Worlds Fair Project. I wanted to measure this because I thought it would be a great way to tie the two projects together and I was already using a lot of the trigonometry that we were learning about when doing calculations for the airship. To include what we had learned, I decided to break it down into parts. I found the lengths of each side of a theoretical cross section of the zeppelin, then I found the area of that shape, which was a nonagon, and last i found the volume using the length of the object. I separated the Zeppelin into three parts, the main body, the tail of the ship, and the nose of the ship.
To start off the calculations I asked one of my group mates from the Worlds Fair group, what we were planning to set the perimeter or circumference of the zeppelin as. This measurement (37.7 in.) was fairly arbitrary but I wanted to get accurate measurements for our model. I then recalled that we were making our zeppelin so that it would have nine sides around and so I divided the perimeter by 9. I also divided 360 by nine because I was going to break the nonagon that was formed from the cross section of the zeppelin into triangles
To start off the calculations I asked one of my group mates from the Worlds Fair group, what we were planning to set the perimeter or circumference of the zeppelin as. This measurement (37.7 in.) was fairly arbitrary but I wanted to get accurate measurements for our model. I then recalled that we were making our zeppelin so that it would have nine sides around and so I divided the perimeter by 9. I also divided 360 by nine because I was going to break the nonagon that was formed from the cross section of the zeppelin into triangles

I had now measured in the 1st dimension of distance, and by measuring the area of the nonagon using the formula A = 1/2 * Base * Height on each triangle inside the nonagon and then multiplying that by 9, I had measured in the 2nd dimension of area. The area that I determined to be 108.425 in. squared was very vital in finding the volume of the three parts that I divided the zeppelin into as it would become the base of each 3 dimensional shape. I started with the somewhat cylindrical object that was the main body of the ship. This was fairly simple because I just needed to multiply the perimeter (or base) by the height (or length) of the prism. (V = Base * Height) to get a total volume of 3903.3 in. cubed.
Moving on to the front nose, I chose to use several frustums rather than one parabolic cone partly because we hadn't officially learned the formula for the volume of a parabolic cone and partly because we learned about frustums recently and I thought it would be good to tie it in. I started off with a full pyramid with a height of 16 in. and a base of the perimeter, 108.425 in. squared. Using the formula V(pyramid) = 1/3 * Base * Height I got the total pyramid volume of 578.267 in. cubed. By creating a slice of that pyramid that had a height of 10 in. and a base of 67.7656 in. squared (which i determined via a proportion between the full pyramid and this smaller one) I could use the same formula to get the volume of the smaller pyramid which was 225.88 in. cubed. I could then subtract the smaller pyramid from the larger and get the volume of the first frustum which was 352.387
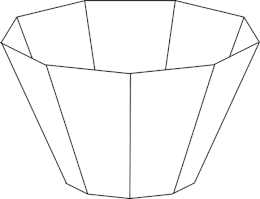
I did the same for a shorter frustum at the very end of the zeppelin where the total height was 12 and the slice height was 6 (effectively halving it) the base for the larger was the area of the top of the previous frustum and I found the smaller base by once again creating a proportion. I calculated the total volume of the second frustum to be 203.5 in. cubed.
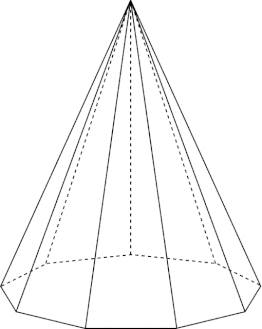
Finally I found the volume of a pyramid for the back tail and that was fairly simple considering that I just had to take the base which was 108.425 in. squared by the height which was 12 in. and plug them into the formula for a pyramid to get 433.7 in. cubed
Finally I found the volume of a pyramid for the back tail and that was fairly simple considering that I just had to take the base which was 108.425 in. squared by the height which was 12 in. and plug them into the formula for a pyramid to get 433.7 in. cubed
At the end I simply added all of the volumes up to get a total volume of 4892.887 in. cubed.
The project went pretty quickly if I focused and kept myself organized. I faced some challenges along the way such as finding the volume of the slices of pyramids. This was an issue because I had to figure out a way to find the base before I could find the volume, and considering that I had limited information to go off of, it took some careful thought before I got to the idea of using proportions. I figured that pyramids could be thought of as 3 dimensional triangles so I came to the conclusion that a slice off of the larger pyramid would be similar and therefore I could create a proportion.
Throughout the project I noticed that some main Habits of Mathematicians that I was using were things like staying organized, and taking apart and putting back together. I needed to label all of the important calculations because I needed to use them later and if I was coming back to a page of calculations and I had no idea where I left off I would effectively have to start over or take more time to find my place. I ended up breaking the Zeppelin down to its fundamentals and from that I was able to piece it together and find its total volume. Throughout the project I also used generalized formulas that we derived earlier to solve for the very specific dimensions of the ship.
I definitely would have done some things differently if I were to do a similar project. In this case I would have studied the formula for a paraboloid rather than many frusta because it would be that much more accurate to the actual shape of the Zeppelin. I would also try to take the time to 3d model it whether that means printing it or just creating a CAD model so that I could visualize it and refer to it when calculating or presenting.
Update 1:
The purpose of this project is to explore how we measure the world around us, working our way up the amounts of dimensions. We began the project with a dive into what exactly the Pythagorean Theorem is. As always we took a formula that was pretty well known and explored why it worked so that we could later dissect other theories. This Theorem is the basis for much of the projects formulas and ideals. The first worksheet, Proof by Rugs, was meant to reacquaint ourselves with the Pythagorean theorem and to launch the question of why it works the way it does. We first looked at the Pythagorean Theorem in terms of area, on one rug the shorter leg (let's call it a) of a right triangle and that of another created a square that had an a*a area. The longer leg (call it b) of two right triangles that were congruent to the previous made another larger square that had an area of b*b. This proved that the area of the hypotenuse when thinking about it in terms of this picture:
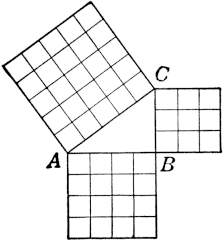
would be equal to the area of the smaller a*a (or a^2) square plus the larger b*b (or b^2) square.
We then took a step backwards, now knowing how the Pythagorean theorem worked, to understand what distance represented in a dimensional sense. Distance could be considered a first dimension because it doesn't have any two dimensional height, it is just a single line with a certain length. We looked at distances on a plane so that we could assign certain points to it. This is where the Pythagorean theorem came in handy. By creating a line along a random point you could create a triangle by dropping a line that was perpendicular to the x axis and then creating a third line to create a triangle. The line that you initially started out with would be the hypotenuse and if you know the distance of the other lines you could use the Pythagorean theorem to solve for the hypotenuse.
We then took a step backwards, now knowing how the Pythagorean theorem worked, to understand what distance represented in a dimensional sense. Distance could be considered a first dimension because it doesn't have any two dimensional height, it is just a single line with a certain length. We looked at distances on a plane so that we could assign certain points to it. This is where the Pythagorean theorem came in handy. By creating a line along a random point you could create a triangle by dropping a line that was perpendicular to the x axis and then creating a third line to create a triangle. The line that you initially started out with would be the hypotenuse and if you know the distance of the other lines you could use the Pythagorean theorem to solve for the hypotenuse.
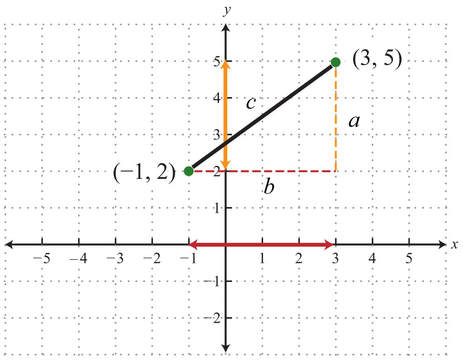
Taking into account the fact that the points are coordinates, the final formula would look like: d = √(Xsub2 - Xsub1)^2 + (Ysub2 - Ysub1)^2.
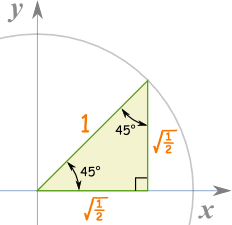
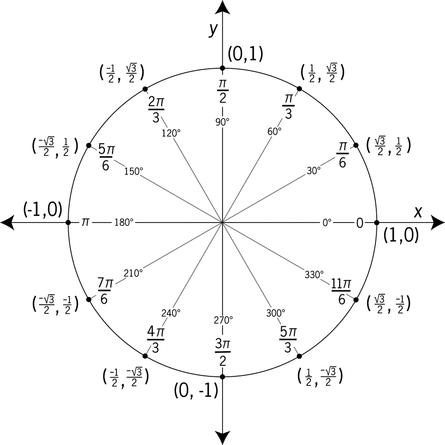
From this we could then go visualize a circle with a radius 1 centered around the origin of a plane, this circle we soon came to find out would be called the Unit Circle because of its radius of 1 creating a shared hypotenuse length. We decided to see how to find any point using the distance formula and the fact that the radius was 1. If we are given one coordinate we can solve for the other by getting that coordinate on one side of the Pythagorean Theorem and solving the constants on the other side of the equation. Now we took this further to the point where we don't need a coordinate to solve for the other but instead we could use the angles of the right triangles made when dropping a perpendicular and drawing a line back to the origin. We started with a triangle that had two equal angles of 45 degrees. This was our starting point because this 45, 45, 90 degree triangle, by the nature of its two equal angles had to be an isosceles triangle. This doesn't sound very special until you recall that isosceles triangles have two equal sides meaning that the x length and the y length would equal the same. If you replaced one of the lengths with the other you could find the length once again using the Pythagorean Theorem. In our case we made it x so: X^2 + X^2 = 1 we then solved for x:
2X^2 = 1
X^2 = 1/2
X = √1/2
To make it arbitrarily correct we made sure we had the radical on top of the fraction so our final length was √2/2
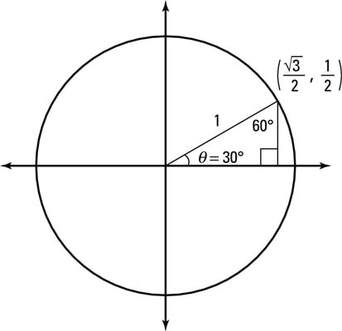
From there we continued on to other triangles and angles on the circle. Our next triangle was that with a 30 degree angle. To make it add up to 180 degrees the other angle had to be 60 degrees. After some thought and experimentation to see how we could use what we knew to find the side lengths of this triangle, we came together to point out that you could use reflection (something we had reviewed earlier in the year) over the x axis to make the scalene triangle equilateral. This was true because now two sides were equal at 1 but more importantly the angles in the triangle were all 60 degrees. If the combined length of the line touching the circle was also one, the triangle before the reflection should have half that, or 1/2. Now that we had two lengths of the triangle we could solve for the third once again using the Pythagorean Theorem:
X^2 + (1/2)^2 = 1
X^2 + 1/4 = 1
X^2 = 3/4
X = √3/4 or √3/2
X^2 + (1/2)^2 = 1
X^2 + 1/4 = 1
X^2 = 3/4
X = √3/4 or √3/2
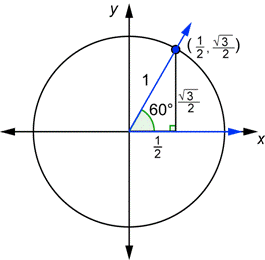
Lastly for a triangle on the unit circle, we looked at the 60 degree triangle. Many of us could see the similarity to the 30 degree triangle right away but we didn't quite know what it meant. To find the sides we couldn't reflect like we did with the 30 degree triangle so once again we had to think of another way to find these side lengths. I constantly had a feeling that the correlation between this triangle and the 30 degree triangle had something to do with how we could solve for the sides but it didn't quite click until Dr. Drew told me to really look at the two triangles. I realized that if you oriented the 30 degree triangle so that it would fit behind the 60 degree triangle you would note that they were congruent. This meant that the coordinate points would be the exact same but flipped. I thought this was such an ingenious and tactile way to solve for sides.
Our final step to wrap up the unit circle was to find all of the other points by circular symmetry. Since the circle was centered around the origin, finding the equivalent points in other coordinates was as simple as changing points to their negative values respectively.
With all of this talk of angles, many who knew a bit about trigonometry were eager to jump back into it. And so we used the unit circle as a way to define sine and cosine. We learned that cosine represented the angle corresponding to the x axis of a triangle on a plane and that sine represented the y axis of a triangle on a plane. If you took this triangle out of the circle the cosine of an angle would be equal to one specific side of a right triangle that we would later come to know as the adjacent side.
From the sine and cosine definitions we took a bit of a detour to understand tangents. We did a proof for why a tangent is perpendicular to a radial line and this was another clever proof because you could just fold the line over the radial line and if the two halves of the tangent matched up it must be at a 90 degree angle. You could also say that if the tangent only touches one point on the circle it must be a right angle to the radius, this is because if weren't to be perpendicular it would touch another point on the line and wouldn't be a tangent at that point. This still didn't explain how exactly tangent fits into the rest of what we are learning so we brought it back to the unit circle and right triangles.
From the sine and cosine definitions we took a bit of a detour to understand tangents. We did a proof for why a tangent is perpendicular to a radial line and this was another clever proof because you could just fold the line over the radial line and if the two halves of the tangent matched up it must be at a 90 degree angle. You could also say that if the tangent only touches one point on the circle it must be a right angle to the radius, this is because if weren't to be perpendicular it would touch another point on the line and wouldn't be a tangent at that point. This still didn't explain how exactly tangent fits into the rest of what we are learning so we brought it back to the unit circle and right triangles.
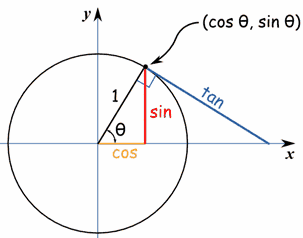
We applied the tangent to a right triangle and used the shared angles to prove that the larger right angle that the tangent made and the smallest triangle were similar triangles. We can then figure out that the length of the tangent over 1 would then have to equal sine and cosine or in other words:
Tan/1 = y/x
Tan = y/x
Tan = Sin/Cos
After this we simplified what the sides of a right triangle were named...
Tan/1 = y/x
Tan = y/x
Tan = Sin/Cos
After this we simplified what the sides of a right triangle were named...
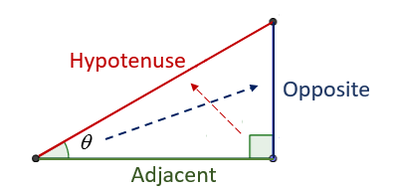
From the angle the side closest to or touching it would be the adjacent, the side across from it would be the opposite and of course the hypotenuse is the longest side of them all. This was important shortly after when we got into generalizing these equations for any triangle.
So far we had been working with triangles that had a hypotenuse of 1 but as is most common in this class we needed to generalize this idea for any right triangle. Using the side classifications we recalled that cosine represented the x axis so therefore it must be adjacent to the angle we can then write this as:
COS = a/h
Similarly since sine is the representation of the y axis and thus the opposite side it would be written like this:
SIN = o/h
And of course as we derived earlier tangent is the sine over the cosine so it would look like this:
TAN = o/a
Of course almost everyone knows the catchy SOHCAHTOA that helps you remember how to write out each formula.
There are times when you will be given the side lengths of a triangle but not the angles, in this case you would use the inverse of these trigonometric functions. Arcsine, arccosine, and arctangent are the names of the inverse identities of sine, cosine, and tangent. We practiced with them but didn't go too deep into how they come about other than by using the unit circle.
A very interesting real life example of trigonometry was displayed when we did the Mount Everest problem.
The challenge was to find the other lengths of the triangle that was not a right triangle. This is where our trigonometry generalized and this was the start of the Law of Sines. When experimenting with the Everest problem we decided it would make the most sense to split it into two right triangles. Now the part that could get you stuck was where to add a perpendicular line so that you could solve for the other lengths. You wanted the only side length and all of the angles of the triangle on one triangle because if you divided the side with a known length you would not know how much would be on each side of the perpendicular. By now having a right triangle with a known hypotenuse we could find the height of that triangle and the length of the other leg. With these measurements we could find the other hypotenuse and other leg of the right triangle which would give us all of the sides of our triangle. This was essentially the proof and prelude to the Law of Sines
Of course we wanted to simplify the process so we derived this law by visualizing a random triangle such as the following
Of course we wanted to simplify the process so we derived this law by visualizing a random triangle such as the following
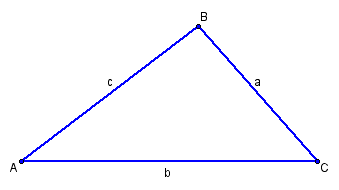
The Law of Sines we came to find out meant that an angle a, b, or c corresponded to an opposite side A, B, or C. If we divided side A, B, or C by angle a, b, or c they would all be equivalent
A/Sin(a) = B/Sin(b) = C/Sin(c)
To find a side length or angle you would only use the two that you need, this would be determined by what you are given to start with. As if to emulate the structural strength of a triangle, this formula supported itself in a simple and unbreakable way.
The Law of Cosines was a variation of the law of sines and is mainly used when solving for a third side after knowing the length of two sides and the angle in between the two. This was more of a flashback to previous work as its formula is very reminiscent of the Pythagorean Theorem: c^2 = a^2 + b^2 - 2ab Cos(c)
The 2ab Cos(c) is the part that differentiates the two formulas and it is there to generalize the process to fit all triangles.
This project has been about constant generalization and exploration of dimension after dimension so there will be more to come soon.
